03_Git 代码提交规范
常见的 commit message 规范有:atom,eslint和Angular等,其中 Angular 规范更为通用。
现在市面上比较流行的 Git 代码提交规范方案是Conventional Commit (约定式提交规范),它受到了Angular 提交准则的启发,并在很大程度上以其为依据。
约定式提交规范是一种基于提交消息的轻量级约定。它提供了一组用于创建清晰的提交历史的简单规则;这使得编写基于规范的自动化工具变得更容易。这个约定与 SemVer 相吻合,在提交信息中描述新特性、bug 修复和破坏性变更
- 规范化提交(无论哪种方式,要做到
统一、简明) - 一处变更一次 commit(不要多处、多次修改堆积成一次 commit 提交,这对后期分析 bug 不利)
约定式提交
约定式提交:每次使用git commit 的时候都需要写 commit message,如果 message 的 style 是按照固定的模版格式书写,对于后期的维护和编写 changelog 都有巨大的好处。
而且现在的很多自动生成 changelog 的工具,都是建立在约定式提交的基础之上。
优点
- 可读性好,清晰,不必深入看代码即可了解当前 commit 的作用。
- 为 Code Reviewing 做准备
- 方便跟踪工程历史
- 让其他的开发者在运行 git blame 的时候想跪谢
- 提高项目的整体质量,提高个人工程素质
1.约定式提交规范
1.提交格式:
type:提交的类型;
scope:代码修改的范围:用于说明 commit 影响的范围,比如数据层、控制层、视图层等等,视项目不同而不同。
desctiption:对提交代码做一个简短的说明
<type>[opting scope]: <desctiption>
// 空一行
[optional body]
// 空一行
[optional footer(s)]---------- 翻译 ----------
Header (<类型>[可选的范围]: <描述>)
[header 包含三部分内容: 类型 type(必需),可选的范围 scope(可选),描述 desctiption(必需)]
type: 代码提交的类型Type 作用 feat 新增特性 (feature) fix 修复 Bug(bug fix) docs 修改文档 (documentation) style 代码格式修改(white-space, formatting, missing semi colons, etc) refactor 代码重构(refactor) perf 改善性能(A code change that improves performance) test 测试(when adding missing tests) build 变更项目构建或外部依赖(例如 scopes: webpack、gulp、npm 等) ci 更改持续集成软件的配置文件和 package 中的 scripts 命令,例如 scopes: Travis, Circle 等 chore 变更构建流程或辅助工具(比如更改测试环境) revert 代码回退 bashadd:增加 del:删除 mod:修改 update:更新 feat: 新功能的开发 fix: bug的修复 docs: 文档的的修改变动 style: 代码格式的修改 refactor: 对已有功能进行重构(即不是新增功能,也不是修改bug的代码变动) perf: 性能优化 test: 增加测试 build: 修改影响到了系统的构建或外部依赖 ci: 修改CI配置文件或相关的脚本 chore: 构建过程或辅助工具的变动 done: 已完成 import:导入库 revert:撤销上一次的 commit merge:合并分支操作中文示例
bash【新增功能】-【新的功能点、新的需求】 【Bug修复】-【修复的Bug:现网发散Bug、测试阶段的Bug、验收阶段的Bug】 【文档修改】-【只是修改了文档:注释、README.md等】. 【样式修改】-【不影响代码功能的修改:CSS样式、代码格式化等】 【代码重构】-【代码更改既不修复错误也不添加功能】 【性能优化】-【代码更改能够提升性能】 【测试代码】-【添加缺失测试或更正现有测试】 【编译代码】-【影响构建系统或外部依赖项的更改:build.gradle、package.json、Podfile等】 【持续集成】-【咱们的CI配置文件和脚本的更改:Jenkinsfile等】 【回退更改】-【代码回退提交更改】 【其余提交】-【除以上全部类型以外的提交更改】scope:用于说明 commit 影响的范围,比如数据层,控制层,视图层等等。desctiption:commit 提交的目的的简短描述,不超过 50 个字符Body([可选的正文])
Body 部分是对本次 commit 的详细描述:
此次提交的详细描述,描述为什么修改,做了什么样的修改,以及开发的思路等等。
可以分成多行,如
为什么修改,做了什么修改,开发的思路
- 修改了什么要点
- 使用了什么库,达到什么目的
Footer( [可选的脚注] )
Footer 脚注部分只用于两种情况
不兼容破坏性变动
如果当前代码与上一个版本不兼容,产生了破坏性变更,则 Footer 部分以 BREAKING CHANGE 开头,后面是对变动的描述,以及变动理由和迁移方法。如:
BREAKING CHANGE: 隔离作用域绑定定义已更改。
按照下面的例子来迁移代码: Before:
scope: {
myAttr: 'attribute',
}
After:
scope: {
myAttr: '@',
}
删除的' inject '已经没有用处,所以不再使用它。关闭 Issue(Closed issues:):罗列此次提交修复的 bug,如:
参考文档: User Docs | GitLab
fixes issue #110
Closes #234
Closes #123, #245, #992
3.commit 提交的例子:
最简单的例子:
fix(首页菜单栏):添加缺少的图标全部规范包含的例子:
docs[登录授权]:修改了登录授权文档

将文档中的公司改成企业授权

closes issue #10 (关闭了第10个问题)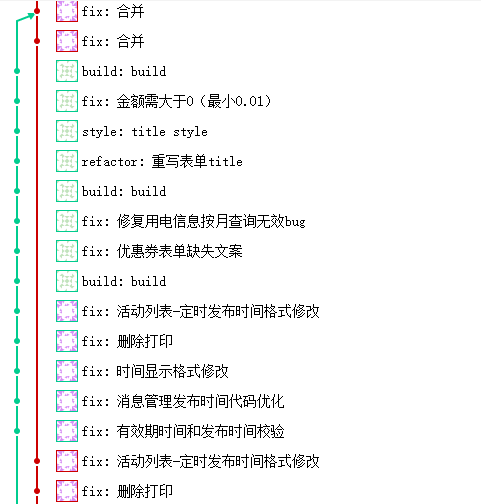
2、自建 git 提交信息模板来作为团队提交规范
如果你的团队对提交信息有格式要求,可以在系统上创建一个文件,并配置 git 把它作为默认的模板,这样可以更加容易地使提交信息遵循格式。
通过以下命令来配置提交信息模板:
git config commit.template   [模板文件名]    //这个命令只能设置当前分支的提交模板
git config — —global commit.template [模板文件名] //这个命令能设置全局的提交模板,注意global前面是两杠新建 .gitmessage.txt(模板文件) 内容可以如下:
# headr: <type>(<scope>): <subject>
# - type: feat, fix, docs, style, refactor, test, chore
# - scope: can be empty
# - subject: start with verb (such as 'change'), 50-character line
#
# body: 72-character wrapped. This should answer:
# * Why was this change necessary?
# * How does it address the problem?
# * Are there any side effects?
#
# footer:
# - Include a link to the issue.
# - BREAKING CHANGE
#3、使用工具 commit 符合规范
3.1 commitizen + cz-conventional-changelog:提交工具
commitizen(cz-cli):是一款可以交互式建立提交信息的工具。它帮助我们从 type 开始一步步建立提交信息可根据不同的
adapter配置 commit messagecz-customizable:可自定义的 Commitizen 插件(或独立实用程序),可帮助实现一致的提交消息。和 cz-conventional-changelog 一样的作用cz-conventional-changelog:Angular 的 adapter(适配器) commit message 格式commitizen 是一个撰写合格 commit message 的工具,用于代替 git commit 指令,而 cz-conventional-changelog 适配器提供 conventional-changelog 标准(约定式提交标准)。基于不一样需求,也可使用不一样适配器
全局环境下安装:
commitizen 根据不同的
adapter配置 commit message。例如,要使用 Angular 的 commit message 格式,可以安装cz-conventional-changelog。
# 需要同时安装commitizen和cz-conventional-changelog,后者是adapter
$ npm install -g commitizen cz-conventional-changelog
# 配置安装的adapter: 全局模式下,需要 ~/.czrc 配置文件, 为commitizen指定Adapter
$ echo '{ "path": "cz-conventional-changelog" }' > ~/.czrc本地项目安装:
# 安装commitizen
$ npm install --save-dev commitizen
# 接下来安装适配器
# npm版本要 >= 5.2
$ npx commitizen init cz-conventional-changelog --save-dev --save-exact
或者
$ npm i cz-customizable --save-devps: 对于非Node项目(java、php...)在执行上一条安装适配器的命令前,需要手动创建package.json文件
npm init --yes1.如果是安装:cz-customizable,那么要在 package.json 配置
"config": {
  "commitizen": {
    "path": "node_modules/cz-customizable"
    // "path": "node_modules/cz-conventional-changelog"
  }
}2.接着在项目根目录创建 .cz-config.js 自定义提示文件:两种格式
官方提供的配置信息:github.com
"use strict";
module.exports = {
	types: [
		{ value: "feat", name: "新增:新增功能、页面" },
		{ value: "fix", name: "bug:修复某个bug" },
		{ value: "docs", name: "文档:修改增加文档、注释" },
		{ value: "style", name: "格式:不影响代码运行的变动、空格、格式化等等" },
		{ value: "ui", name: "ui修改:布局、css样式等等" },
		{ value: "hotfix", name: "bug:修复线上紧急bug" },
		{ value: "build", name: "测试:添加一个测试" },
		{ value: "refactor", name: "重构:代码重构,未新增任何功能和修复任何bug" },
		{ value: "revert", name: "回滚:代码回退到某个版本节点" },
		{ value: "perf", name: "优化:提升性能、用户体验等" },
		{ value: "ci", name: "自动化构建:对CI/CD配置文件和脚本的更改" },
		{ value: "chore", name: "其他修改:不修改src目录或测试文件的修改" },
		{ value: "test", name: "测试:包括单元测试、集成测试" },
		{ value: "update", name: "更新:普通更新" },
	],
	// 交互提示信息
	messages: {
		type: "选择一种你的提交类型:",
		scope: "选择一个影响范围(可选):",
		customScope: "表示此更改的范围:",
		subject: "短说明:\n",
		body: '长说明,使用"|"符号换行(可选):\n',
		breaking: "非兼容性说明(可选):\n",
		footer: "关闭的issue,例如:#31, #34(可选):\n",
		confirmCommit: "确定提交说明?(yes/no)",
	},
	allowCustomScopes: true,
	// 设置选择了那些type,才询问 breaking message
	allowBreakingChanges: ["feat", "fix", "ui", "hotfix", "update", "perf"],
	subjectLimit: 100,
};// 配置选项:https://github.com/leoforfree/cz-customizable/blob/master/cz-config-EXAMPLE.js
// type: {Array of Object}:项目中使用的 type 和默认描述。
// scopes: {Array of Strings}:预设项目中使用的可选 scope 。如:在一个银行系统项目中使用 [“acccounts”, “payments”];在一个旅行应用中使用 [“bookings”, “search”, “profile”]。
// scopeOverrides: {Object where key contains a Array of String}:当您想重写特定提交类型的作用域时,使用此方法。如:在类型为“fix”时指定范围 { fix: [ {name: 'merge'}, {name: 'style'}, {name: 'e2eTest'},{name: 'unitTest'} ] }。
// allowCustomScopes: {boolean, default false}:增加自定义 scope 选项,开启可以在设置 scope 时支持直接输入。
// allowBreakingChanges: {Array of Strings: default none}:配置想要 breaking change 弹出提示的scope列表,如:[‘feat’, ‘fix’]。
// appendBranchNameToCommitMessage:当配合 cz-customizable-ghooks 使用 cz-customizable 时, 可自动获取分支名称并添加到 commit message 中,此功能已经在 cz-customizable-ghooks实现,对应选项已经被添加到 cz-customizable-ghooks, v1.3.0. 中,默认值为 true。
// breakingPrefix: {string, default ‘BREAKING CHANGE:’}:设置自定义 breaking change 块。
// footerPrefix: {string, default ‘ISSUES CLOSED:’}:设置自定义 foot 块。
module.exports = {
// 可选类型
types: [
{
value: 'feat',
name : 'feat: 新功能'
},
{
value: 'fix',
name : 'fix: bug修复'
},
{
value: 'docs',
name : 'docs: 文档变更'
},
{
value: 'style',
name : 'style: 代码格式(不影响代码运行的变动)'
},
{
value: 'refactor',
name : 'refactor: 重构(既不是增加feature,也不是修复bug)'
},
{
value: 'perf',
name : 'perf: 性能优化'
},
{
value: 'test',
name : 'test: 增加测试'
},
{
value: 'chore',
name : 'chore: 构建过程或者辅助工具的变动'
},
{
value: 'revert',
name : 'revert: 提交的版本回退'
},
{
value: 'build',
name : 'build: 打包'
}
],
// 配置想要 breaking change 弹出提示的scope列表
allowBreakingChanges: ['feat', 'fix', 'refactor', 'perf', 'build', 'revert'],
// 消息步骤
"messages": {
type: "请选择提交类型",
customScope: '请输入修改范围(可选)',
subject: '请简要描述提交(必填)',
body: '请输入详细描述(可选)',
footer: '请输入要关闭的issue(可选)',
confirmCommit: '确认使用以上信息提交?(y/n/e/h)',
},
// 跳过问题
"skipQuestions": ['body', 'footer']
// 文字长度:默认是72
subjectLinmit: 72安装完毕后,可直接使用 git cz 来取代 git commit。
以后,凡是用到git commit命令,一律改为使用git cz,就会出现选项,用来生成符合格式的 Commit message
git cz提交流程展示:
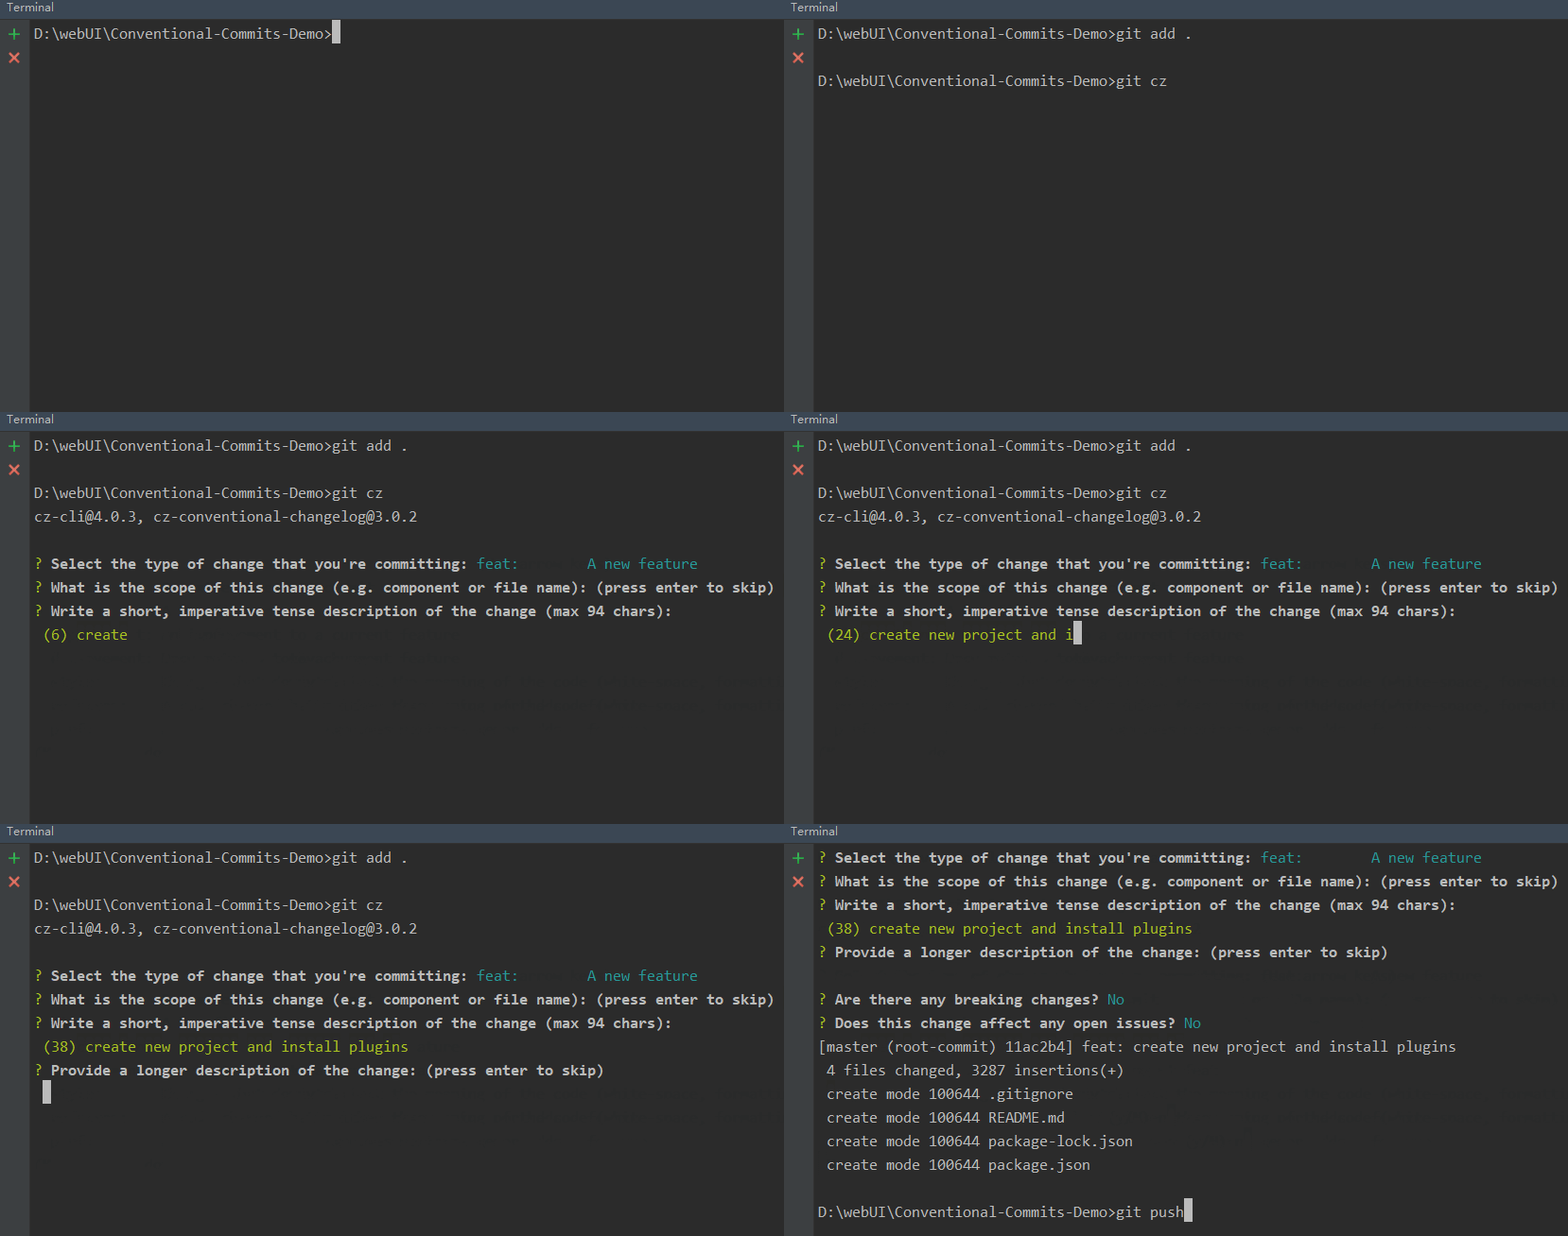
执行git czc 进入 interactive 模式,根据提示依次填写 blog

任何 git commit 指令的 option 都能用在 git cz 指令上, 例如 git cz -a
上面我们完成了 commitizen 的安装与提交规范的制定。
3.2 git commit 规范化工具 -- commitlint
3.2-1 @commitlint/cli + @commitlint/config-conventional(规范)
如果要自定义提交规范,就不用安装
@commitlint/config-conventional
@commitlint:是一个提交验证工具。原理是可以在实际的 git commit 提交到远程仓库之前使用 git 钩子来验证信息。提交不符合规则的信息将会被阻止提交到远程仓库。@commitlint/config-conventional:对于Conventional Commits规范,社区已经整理好了@commitlint/config-conventional包
1.首先安装 commitlint 以及 conventional 规范:
# 安装两个库
npm install --save-dev @commitlint/cli @commitlint/config-conventional
# 生成配置文件commitlint.config.js
echo "module.exports = {extends: ['@commitlint/config-angular']};" > commitlint.config.js2. commitlint.config.js 配置文件:
查阅 commitlint 文档:配置 (commitlint.js.org)
在 commitlint.config.js 制定提交 message 规范
/**
 * feature:新功能
 * update:更新某功能
 * fixbug:修补某功能的bug
 * refactor:重构某个功能
 * optimize: 优化构建工具或运行时性能
 * style:仅样式改动
 * docs:仅文档新增/改动
 * chore:构建过程或辅助工具的变动
 */

// 继承自 @commitlint/config-conventional
"module.exports = {extends: ['@commitlint/config-conventional']}";

module.exports = {
	extends: ["@commitlint/config-conventional"],
	// type 的类型定义:表示 git 提交的type必须在以下范围之内
	rules: {
		"type-enum": [
			// 当前验证的错误级别
			2,
			// 在什么情况下进行验证
			"always",
			[
				// 泛型内容:和.cz-config.js文件的内容泛型对应
				"feat", // 新功能 feature
				"fix", // 修复 Bug
				"docs", // 文档注释
				"style", // 代码格式(不影响代码运行的变动)
				"refactor", // 重构(既不增加新功能,也不是修复bug)
				"perf", // 性能优化
				"test", // 增加测试
				"chore", // 构建过程或辅助工具的变动
				"revert", // 回退
				"build", // 打包
			],
		],
		//
		"subject-full-stop": [0, "never"],
		// subject大小写不做校验
		"subject-case": [0, "never"],
	},
};3.接着在 package.json 中配置 commitlint 脚本:
"commitlint": {
   "extends": [
     "@commitlint/config-conventional"
   ]
},上面我们就完成了 commitlint 的安装与提交规范的制定。
3.2-2. Git Hooks + Husky 钩子
如果提交的描述信息不符合Conventional Commit (约定式提交规范),可以使用 Git Hooks 阻止当前提交,并抛出对应的错误提示
检验 commit message 的最佳方式是结合 git hook,所以需要配合 Husky
Git 也预先定义了一些“事件钩子”如“commit-msg”、“pre-commit”等,当我们执行对应的 Git 操作时会触发它们,从而通知订阅该事件的 shell script 文件处理我们要进行的任务,这些 shell 脚本文件存放在项目根目录下的.git/hooks 目录中
PS:完整 Git Hooks 钩子说明,请参考官网链接
Git 支持的所有钩子见下表(加粗的为常用钩子):
| Git Hook | 调用时机 | 说明 |
|---|---|---|
| pre-applypatch | git am执行前 | |
| applypatch-msg | git am执行前 | |
| post-applypatch | git am执行后 | 不影响git am的结果 |
| pre-commit | git commit执行前 | 可以用git commit --no-verify绕过 |
| commit-msg | git commit执行前 | 可以用git commit --no-verify绕过 |
| post-commit | git commit执行后 | 不影响git commit的结果 |
| pre-merge-commit | git merge执行前 | 可以用git merge --no-verify绕过。 |
| prepare-commit-msg | git commit执行后,编辑器打开之前 | |
| pre-rebase | git rebase执行前 | |
| post-checkout | git checkout或git switch执行后 | 如果不使用--no-checkout参数,则在git clone之后也会执行。 |
| post-merge | git commit执行后 | 在执行git pull时也会被调用 |
| pre-push | git push执行前 | |
| pre-receive | git-receive-pack执行前 | |
| update | ||
| post-receive | git-receive-pack执行后 | 不影响git-receive-pack的结果 |
| post-update | 当 git-receive-pack对 git push 作出反应并更新仓库中的引用时 | |
| push-to-checkout | 当``git-receive-pack对git push做出反应并更新仓库中的引用时,以及当推送试图更新当前被签出的分支且receive.denyCurrentBranch配置被设置为updateInstead`时 | |
| pre-auto-gc | git gc --auto执行前 | |
| post-rewrite | 执行git commit --amend或git rebase时 | |
| sendemail-validate | git send-email执行前 | |
| fsmonitor-watchman | 配置core.fsmonitor被设置为.git/hooks/fsmonitor-watchman或.git/hooks/fsmonitor-watchmanv2时 | |
| p4-pre-submit | git-p4 submit执行前 | 可以用git-p4 submit --no-verify绕过 |
| p4-prepare-changelist | git-p4 submit执行后,编辑器启动前 | 可以用git-p4 submit --no-verify绕过 |
| p4-changelist | git-p4 submit执行并编辑完changelist message后 | 可以用git-p4 submit --no-verify绕过 |
| p4-post-changelist | git-p4 submit执行后 | |
| post-index-change | 索引被写入到read-cache.c do_write_locked_index后 |
husky 钩子介绍
husky 是一个增强的
git hook工具。可以在 git hook 的各个阶段执行我们在 package.json 中配置好的 npm script。
husky 继承了 Git 下所有的钩子,在触发钩子的时候,husky 可以阻止不合法的 commit,push 等等。
Husky 的原理是让我们在项目根目录中写一个配置文件,然后在安装 Husky 的时候把配置文件和 Git Hook 关联起来,这样我们就能在团队中使用 Git Hook 了。
注意使用 husky 之前,必须先将代码放到 git 仓库中,否则本地没有.git 文件,就没有地方去继承钩子了。
通俗来讲:commitlint 是检查提交信息工具,husky 则是负责什么时候执行检查
官网:Husky - Git hooks (typicode.github.io)
github:typicode/husky: Git hooks made easy 🐶 woof! (github.com)
husky有什么用?
当我们commit message时,可以进行测试和 lint 操作,保证仓库里的代码是优雅的。 当我们进行 commit 操作时,会触发pre-commit,在此阶段,可进行 test 和 lint。其后,会触发commit-msg,对 commit 的 message 内容进行验证。
pre-commit
一般的 lint 会全局扫描,但是在此阶段,我们仅需要对暂存区的代码进行 lint 即可。所以使用lint-staged插件。
commit-msg
在此阶段,可用 @commitlint/cli @commitlint/config-conventional 对提交信息进行验证。但是记信息格式规范真的太太太太麻烦了,所以可用 commitizen cz-git 生成提交信息。
从上述说明中,可以得出 husky 配置的基本流程:
- 安装 husky;安装 lint-staged @commitlint/cli @commitlint/config-conventional commitizen cz-git
- 写 commitlint 和 lint-staged 的配置文件
- 修改 package.json 中的 scripts 和 config
- 添加 pre-commit 和 commit-msg 钩子
命令行美化版配置:如何在自己的项目中一键添加 husky - 掘金 (juejin.cn)
1.安裝 husky 钩子
# 注意 Node.js 版本要 >=10
npm install husky --save-dev2.在 package.json 中生成 prepare 指令 (需要 npm 版本 > 7.0)
直接在 package.json 中手动写入
"script": {
   ...
   "prepare": "husky install"
}或者 终端 生成指令
npm set-script prepare "husky install"3.执行prepare指令
npm run prepare执行成功,则会提示

4.提交规范设置:Vue 3 + Vite + Eslint + prettier + husky + lint-staged 搭建基础项目
commit-msg:消息提交规范设置
添加 commitlint 的 hook 到 husky中,并指令在 commit-msg的 hooks 下执行 npx --no-install commitlint --edit "$1"指令
npx husky add .husky/commit-msg 'npx --no-install commitlint --edit "$1"'此指令会在根目录下的.husky 文件夹 -> 生成了 commit-msg 文件
pre-commit :检测提交时的代码规范设置
通过 husky 监测 pre-commit 钩子,在该钩子下执行 npx eslint --ext .js,.vue src 指令来去进行相关检测
1.执行 以下命令 添加 commit 时的 hook(npx eslint --ext .js,.vue src会在执行该 hook 时运行)
npx husky add .husky/pre-commit 'npx eslint --ext .js,.vue src'此指令会在根目录下的.husky 文件夹 -> 生成了 pre-commit 文件
大批量的格式错误修改耗时耗力,推荐配合lint-staged插件(此插件 vue-cli 里自动安装),来实现提交时自动美化代码格式
没有的话需要安装lint-staged 包
然后在 package.json 中配置
// 或者配置代码自动格式修复:配合pre-commit提交是的代码规范检测
"husky": {
  "hooks": {
    "pre-commit": "lint-staged"
  }
},
"lint-staged": {
  // prettier
  "*.{js,vue}": [
    "prettier --write", // 自动美化代码格式
    "vue-cli-service lint", // vue项目中语法检查
    "git add"
  ]
  // eslint
  // "src/**/*.{js,vue}": [
  //   "eslint --fix", // 自动美化代码格式
  //   "git add"
  // ]
}4.1.或者可以通过配置 commitmsg和 precommit 脚本来执行:
关键配置钩子:
pre-commit:可以用来代码规范化标准格式,并且可以按需指定是否要拒绝本次提交
commit-msg:会在提交前被调用,并且可以按需指定是否要拒绝本次提交
第一种配置:在项目下的 package.json 的"scripts"中配置 commitmsg 和 precommit 脚本
// 这是NPM原生支持的脚本执行定义,当执行“npm run 脚本名”时执行
"scripts": {
  // "precommit": "lint-staged",
  "commitmsg": "commitlint -e $GIT_PARAMS",
},
"config": {
  "commitizen": {
    "path": "cz-customizable"
  }
},第二种配置:根目录下新建配置文件:.huskyrc
4.2.5 版本的 Husky 共支持以下几种格式的配置文件:优先级也是按顺序排列
.huskyrc
.huskyrc.json
.huskyrc.yaml
.huskyrc.yml
.huskyrc.js
husky.config.js.huskyrc 文件配置
// 这是husky扩展的脚本执行的定义方式,当对应git hooks触发时执行(引入 husky版本控制)
"husky": {
  "hooks": {
    // 提交的代码规范
    "pre-commit": "lint-staged"
    // "pre-commit": "npm run lint"
    // 提交消息规范
    "commit-msg": "commitlint -E HUSKY_GIT_PARAMS"
  }
},
// 提交的代码规范设置
"lint-staged": {
  // 这里注意后缀名vue的 ts和js 和react 类型
  "*.{js,vue}": [
    "eslint --fix",
    "git add"
  ]
}5.最后我们可以正常的 git 操作,可以试试有什么限制不给提交
// 1.1 添加整个项目,(后面是个.点号)
git add .
// 1.2 添加某些个文件用这个命令
git add [指定目录/文件]
// 2. 提交到本地仓库
git commit -m "feat:更新了什么东东"下面演示下不符合规范提交示例:
D:\accesscontrol\access_control>git commit -m "featdf: aas"
husky > npm run -s commitmsg (node v8.2.1)

⧗ input:
featdf: aas

✖ type must be one of [feat, fix, docs, style, refactor, perf, test, build, ci, chore, revert] [type-enum]
✖ found 1 problems, 0 warnings

husky > commit-msg hook failed (add --no-verify to bypass)

F:\accesscontrol\access_control>上面 message 不符合提交规范,所以会提示错误。
我们修改下 type
F:\accesscontrol\access_control>git commit -m "feat: 新功能"
husky > npm run -s commitmsg (node v8.2.1)

⧗ input: feat: 新功能
✔ found 0 problems, 0 warnings

[develop 7a20657] feat: 新功能
 1 file changed, 1 insertion(+)

F:\accesscontrol\access_control>最后 commit 成功。
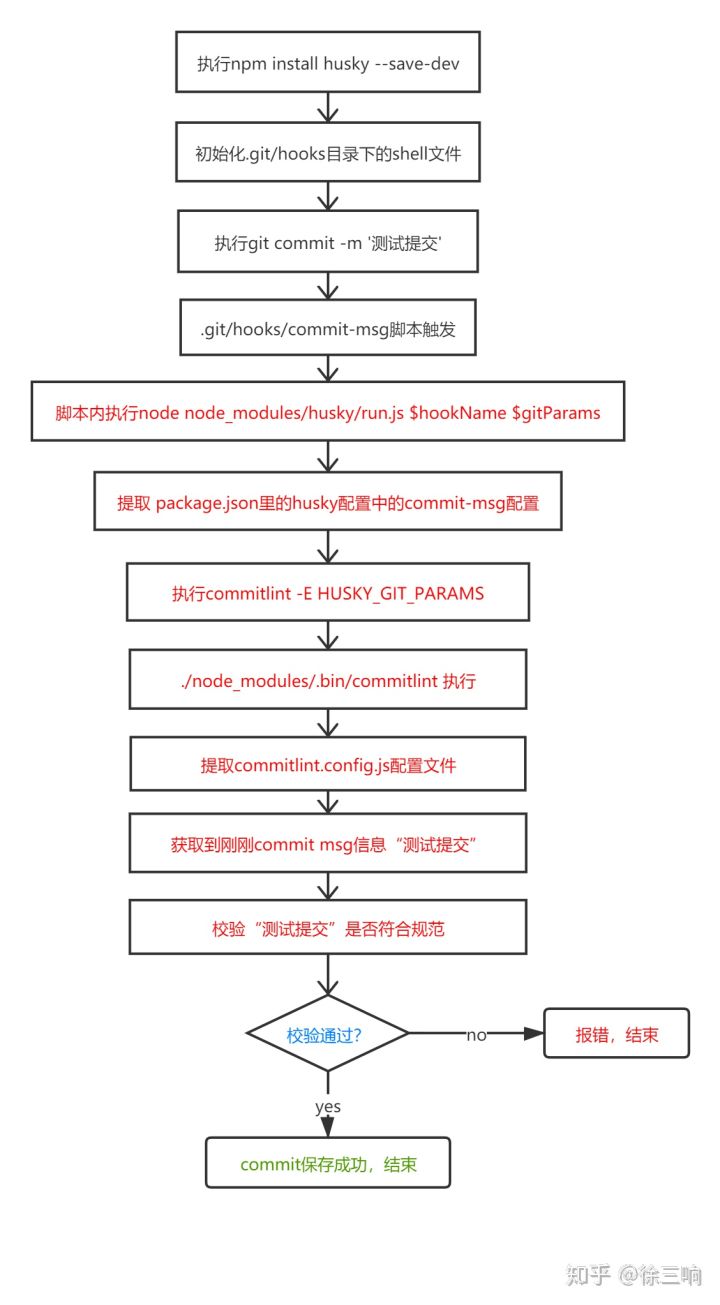
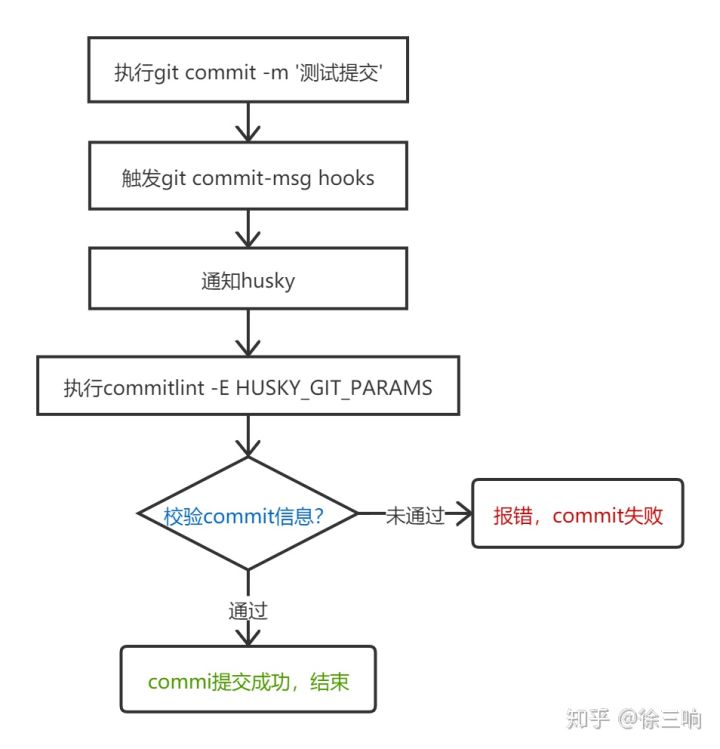
至此,git commit 的大概的执行过程
或者简化版
5、最后总结过程中遇到一些问题 git commit 后可能报错相关‘regenerator-runtime’模块找不到;解决方式:npm install regenerator-runtime –save。 git commit -m “messge”,用双引号
3-2-3. standard-version:语义化开发的版本
想自动生成 CHANGELOG,语义化我们的版本(Semantic Versioning)。 就需要借助 standard-version
standard-version的作用就是生成 changelog 更新 package.json 和 package.lock.json 中的 version 字段。
关于版本:
// 版本
major:主版本号,不兼容的API修改
minor:次版本号,向下兼容,功能性增加
patch:修订号,向下兼容,bug fixed

// 版本发布进度
alpha(内测)
beta(公测)
rc (正式版本的候选版本)  Release Candiate

// npm 发布指令
升级补丁版本号:npm version patch。
升级小版本号:npm version minor。
升级大版本号:npm version major。关于 release:
// 发布首个版本
npm run release -- --first-release

// 发布预发布版本
// 例如:v1.0.0 -> v1.0.0-0
npm run release -- --prerelease

// 发布与首个 alpha 版本
// 例如:v1.0.0 -> 1.0.1-alpha.0
npm run release -- --prerelease alpha

// 发布 major、minor、patch 版本
npm run release -- --release-as minor安装使用
安装命令如下:任选其一
# 全局安装
npm i -g standard-version
# 项目中安装
npm i -S standard-version配置 package.json 的script
{
	"script": {
		// .....
		"release": "standard-version"
	}
}直接执行,即可生成 CHANGELOG 文件
npm run release如果你的所有 Commit 都符合 Angular 格式,那么发布新版本时, Change log 就可以用脚本自动生成
备注:
生成 CHANGELOG 的工具很多,conventional-changelog-cli也可以用来生成 CHANGELOG,安装使用方法和
standard-version类似
4、扩展
4.1 - gitmoji-cli:git commit 的表情工具
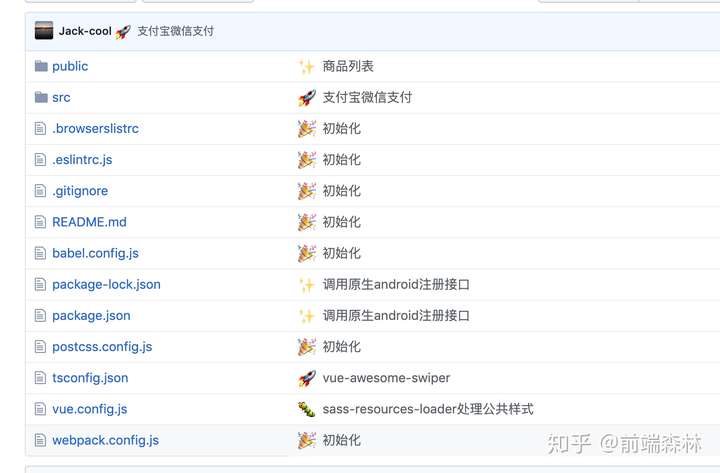
平时与朋友聊天时,我们一定会用到表情包,比如。表情包的出现让我们与朋友之间的沟通变得更加有趣。如果能在 git 提交 commit 时用到表情包,岂不是使每次的 commit 能够更加直观,维护起来也更加方便。
gitmoji是实现 带表情 commit 提交 这种功能的插件
GitHub:https://github.com/carloscuesta/gitmoji
图示:
gitmoji的使用很简单:
# 安装
npm i -g gitmoji-cli
# 使用
git commit -m ':bug: 问题fix'然后可以根据官网示例复制提交:
最后附上一个之前项目针对 git commit 配置的package.json,作为参考:
{
	"name": "ts-axios",
	"version": "0.0.0",
	"description": "",
	"keywords": [],
	"main": "dist/ts-axios.umd.js",
	"module": "dist/ts-axios.es5.js",
	"typings": "dist/types/ts-axios.d.ts",
	"files": ["dist"],
	"author": "fengshuan <1263215592@qq.com>",
	"repository": {
		"type": "git",
		"url": ""
	},
	"license": "MIT",
	"engines": {
		"node": ">=6.0.0"
	},
	"scripts": {
		"dev": "node examples/server.js",
		"lint": "tslint  --project tsconfig.json -t codeFrame 'src/**/*.ts' 'test/**/*.ts'",
		"prebuild": "rimraf dist",
		"build": "tsc --module commonjs && rollup -c rollup.config.ts && typedoc --out docs --target es6 --theme minimal --mode file src",
		"start": "rollup -c rollup.config.ts -w",
		"test": "jest --coverage",
		"test:watch": "jest --coverage --watch",
		"test:prod": "npm run lint && npm run test -- --no-cache",
		"deploy-docs": "ts-node tools/gh-pages-publish",
		"report-coverage": "cat ./coverage/lcov.info | coveralls",
		"commit": "git-cz",
		"semantic-release": "semantic-release",
		"semantic-release-prepare": "ts-node tools/semantic-release-prepare",
		"precommit": "lint-staged",
		"travis-deploy-once": "travis-deploy-once"
	},
	"husky": {
		"hooks": {
			"commit-msg": "commitlint -E HUSKY_GIT_PARAMS"
		}
	},
	"lint-staged": {
		"{src,test}/**/*.ts": ["prettier --write", "git add"]
	},
	"config": {
		"commitizen": {
			"path": "node_modules/cz-conventional-changelog"
		}
	},
	"jest": {
		"transform": {
			".(ts|tsx)": "ts-jest"
		},
		"testEnvironment": "node",
		"testRegex": "(/__tests__/.*|\\.(test|spec))\\.(ts|tsx|js)$",
		"moduleFileExtensions": ["ts", "tsx", "js"],
		"coveragePathIgnorePatterns": ["/node_modules/", "/test/"],
		"coverageThreshold": {
			"global": {
				"branches": 90,
				"functions": 95,
				"lines": 95,
				"statements": 95
			}
		},
		"collectCoverageFrom": ["src/*.{js,ts}"]
	},
	"prettier": {
		"semi": false,
		"singleQuote": true
	},
	"commitlint": {
		"extends": ["@commitlint/config-conventional"]
	},
	"devDependencies": {
		"@commitlint/cli": "^7.1.2",
		"@commitlint/config-conventional": "^7.1.2",
		"@types/jest": "^23.3.2",
		"@types/node": "^10.11.0",
		"body-parser": "^1.19.0",
		"colors": "^1.3.2",
		"commitizen": "^3.0.0",
		"coveralls": "^3.0.2",
		"cross-env": "^5.2.0",
		"cz-conventional-changelog": "^2.1.0",
		"express": "^4.17.1",
		"husky": "^1.0.1",
		"jest": "^23.6.0",
		"jest-config": "^23.6.0",
		"lint-staged": "^8.0.0",
		"lodash.camelcase": "^4.3.0",
		"prettier": "^1.14.3",
		"prompt": "^1.0.0",
		"replace-in-file": "^3.4.2",
		"rimraf": "^2.6.2",
		"rollup": "^0.67.0",
		"rollup-plugin-commonjs": "^9.1.8",
		"rollup-plugin-json": "^3.1.0",
		"rollup-plugin-node-resolve": "^3.4.0",
		"rollup-plugin-sourcemaps": "^0.4.2",
		"rollup-plugin-typescript2": "^0.18.0",
		"semantic-release": "^15.9.16",
		"shelljs": "^0.8.3",
		"travis-deploy-once": "^5.0.9",
		"ts-jest": "^23.10.2",
		"ts-loader": "^6.1.1",
		"ts-node": "^7.0.1",
		"tslint": "^5.11.0",
		"tslint-config-prettier": "^1.15.0",
		"tslint-config-standard": "^8.0.1",
		"tslint-loader": "^3.5.4",
		"typedoc": "^0.12.0",
		"typescript": "^3.0.3",
		"webpack": "^4.40.2",
		"webpack-dev-middleware": "^3.7.1",
		"webpack-hot-middleware": "^2.25.0"
	}
}4.2 - 编辑器相关插件
1.VSCode 编辑器插件:可在 VSCode 插件市场搜索安装
gitlens:git 功能增强插件
vscode 有自带 git 的功能,但是 gitlens 插件更多功能且比较强大
安装好 gitlens 后设置好 git 路径,文件–首选项–设置,点右上角有个小箭头进入设置编辑模式,在里面添加路径,路径在 git 的安装目录里的 bin 目录下的 git.exe 文件,这里切记电脑路径中反斜杠\ 要变成正双斜杠。
"git.path": "D://Program Files//Git//bin//git.exe"功能:
在源代码管理模式下,左侧下方的几个列表就是 GitLens —— Git superchanged 插件的展示操作区
1. COMMITS 提交记录
展示整个提交记录、提交前后文件对比、打开提交文件、推送、拉取、切换分支等
- 打开提交文件:在 COMMITS 里面,单击 openfile 图标打开提交的文件 或者 在路径上右键 Open File
- 推送、拉取、切换分支:在 COMMITS 展开后,点击最上方图标可进行推送、拉取、切换分支等
- 提交记录对照:在 COMMITS 里面选中提交记录,右键 Open Changes
Open Changes with Working File --- 选中提交记录和最新提交记录做对照
Open Previous Changes with Working File --- 选中提交记录的上一条提交记录和最新提交记录做对照
Open Changes with Revison --- 选中提交记录和其他再次选中的提交记录做对照
2. FILE HISTORY 文件历史记录
展示目标文件的历史记录、打开历史记录文件、当前历史记录文件和不同时期的历史记录对照
- 选中目标文件:展开左侧文件列表树,选中目标文件,右键点击 Open File History,FILE HISTORY 会自动切换成当前文件的历史记录
- 打开历史文件:在 FILE HISTORY 里面选中历史记录,右键 Open File
- 历史记录对照:在 FILE HISTORY 里面选中历史记录,右键 Open Changes
Open Changes with Working File --- 选中历史记录和最新历史记录做对照
Open Previous Changes with Working File --- 选中历史记录的上一条历史记录和最新历史记录做对照
Open Changes with Revison --- 选中历史记录和其他再次选中的历史记录做对照
3. BRANCHES 现有分支
展示拉取过的分支、查看哪些分支线上代码更新、切换分支、拉取(pull)
- 查看哪些分支线上代码更新:在 BRANCHES 里,有代码更新的分支呈现橙红色
- 切换分支、拉取:在 BRANCHES 里右侧图标
4. REMOTES 远程所有分支
展示所有远程分支,可查看远程分支上的提交内容
- 鼠标光标点击在一行代码内,会显示提交人和多久前提交
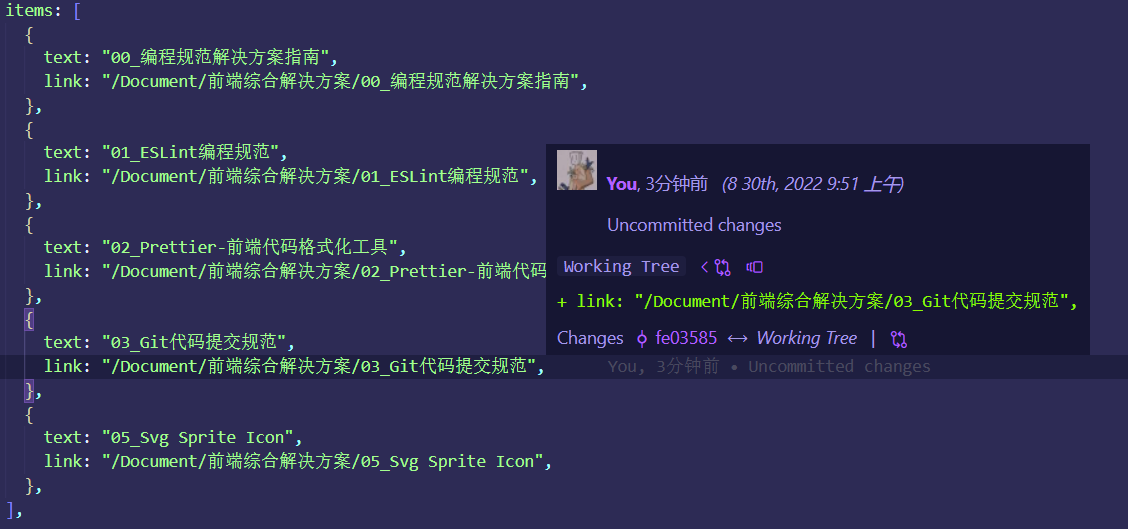
Git History: git 历史插件
和 GitLens —— Git superchanged 相比,更有针对性
调起当前分支的 Git history:在源代码管理模式下点击上方的逆时针表的图标
调起当前分支下当前分级的 Git history:直接右键 GIT:View File History
- 可视化直观展示历史记录
- 可获取提交 id
- 软\硬回滚
- 在历史记录基础上新建分支、
- 将当前历史记录内容和并到当前分支上
- 可选择分支(默认显示当前分支的历史记录)
- 可通过作者、标题来过滤历史记录
- 将当前分支切换到当前历史记录分支(点击绿色),删除远程分支(点击红色)
- 获取文件当前行修改的历史记录:打开文件代码,将光标锁定在当前行,右键,GIT:View Line History
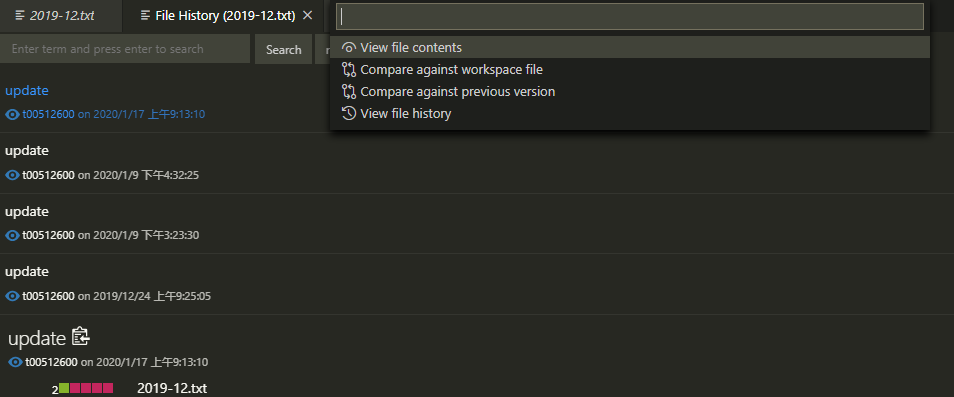
查看单个文件的修改历史:
打开资源管理器,右击要查看的文件,选择 GIt:View File History,即可查看修改历史。
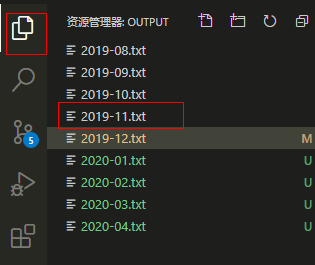
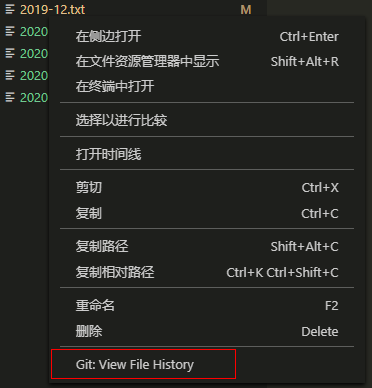

通过单击提交记录,可以进行更加详细地查看:
View file contents:仅浏览文件内容
Compare against workspace file:与当前工作空间下的文件进行对比
Compare against previous version:与上一个版本的文件进行对比
View file history:浏览文件的修改历史
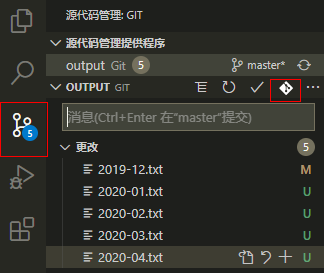
查看 git log 的历史:
打开 git 源代码管理,点击存储库的 git 图标,即可查看该 git 存储库的 git log 历史。

Git Graph:git 可视化插件
调起 Git Graph:在源代码管理模式下点击上方的树杈状的图标 或者 点击左下角的 Git Graph
- 可直观的看到提交记录的注释、时间、作者、commitid 等
- 可选择不同分支,也可多选几个分支
- 获取 commit id :右键 Copy Commit Hash
- 显示当前文件的提交差异对照
2.WebStorm 插件:Git Commit Message Helper
安装方式
idea -> settings -> plugins -> 搜索Git Commit Message Helper

git commit message helper
使用方式
提交时打开 idea commit(ctrl+k)

点击上图红框标识部位,会出现如下弹框,之后便可以在该弹框中填写具体的 commit 信息。


